
With all the laws and regulations around marketing and privacy, it’s no longer enough to just avoid spam words to make sure your email lands on the inbox.
You have to walk the extra mile and set up your DMARC, SPIF, DKIM, and most importantly your BIMI.
BIMI is what makes it possible for …
What is BIMI?
BIMI stands for Brand Indicators for Message Identification.
It is an emerging security technology that improves the authenticity associated with your email marketing efforts through the use and display of brand logos.
It works alongside other email security protocols — DKIM, SPF, and DMARC — to prevent malicious users from accessing your email domains and ensure brand recognition so that your email clients can trust you.
What makes this security technology unique is that it provides visual verification to your emails. It displays a brand’s logo next to the email messages in your customer’s inbox.
That way, they recognize that the message is coming from your brand.
BIMI email specification helps companies use brand controlled logos to ensure readers that apple mail and gmail users that they are receiving legitimate messages from brand with good sender policy framework and sender reputation — no brand spoofing or identity theft going on.
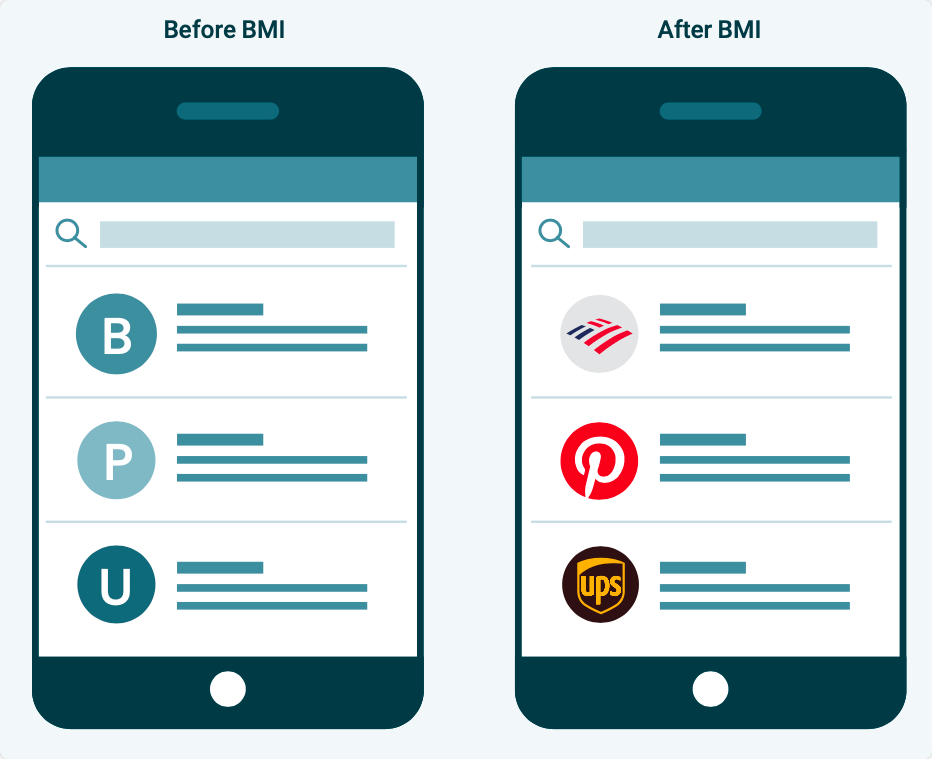
Before the advent of BIMI, the idea behind showing brand logos next to email messages was specific to the mailbox provider of the recipient.
The process was a bit tedious and manual as it utilizes other applications to accumulate brand information and share it across various platforms.
However, the emergence of AuthIndicators group that includes various email service providers such as Google, Verizon, Fast mail, and IONOS by 1&1 is working towards implementing BIMI among the commonly used email service providers.
Read more: 15 Cold Email Templates to Boost Your Sales
How does BIMI work?
BIMI incorporates various processes to validate emails and ensure they are associated with the sender’s domain.
Before the process for BIMI begins, senders must have a TXT record in their domain name system (DNS) records.
Aside from that, they need to have other security protocols in place. They include:
- Sender Policy Framework (SPF): authenticates email to identify the mail servers that are permitted to send from designated domains
- Domain Keys Identified Mail (DKIM): includes a digital signature to every email to verify it was sent by the domain that the email claims it has been sent from.
- Domain-Based Messages Authentication, Reporting, and Conformance (DMARC): DMARC enforcement confirms the records of SPF and DKIM and specifies how unauthenticated emails should be managed.
Side Note: SPF, DKIM, and DMARC implementation is an effective way to ensure optimal email deliverability. They help prevent email scams and always present your emails as authenticated messages. They also tell your recipient’s mailbox providers that your emails originate from legitimate sending servers and your emails will always land in your subscribers’ inboxes.
When emails are sent from a BIMI implemented DNS, the recipient’s mailbox provider conducts the standard SPF validation and DKIM/DMARC authentication.
If the email passes through these processes successfully, the server will check if it possesses a valid BIMI record, validate, and then display your brand’s logo.
The file for your logo has to be in an SVG Tiny Portable/Secure format. SVG stands for Scalable Vector Graphics.
Unlike pixel-based graphics such as JPGs or GIFs, vector graphics define the visual elements and shapes in the image with points and lines.
If your image is in a different file format – PNGs, JPGs, GIFs –, you will have to convert it to SVG for usage with BIMI.
Besides, you have to ensure the file is of the correct size (32 KB) and shape (square). Utilizing this format ensures that your logo looks good anywhere it is displayed by BIMI.
In addition, some email service providers require a verified mark certificate (VMC) to prove you truly own the content and trademark of the logo.
Although it isn’t compulsory at this time of use, it is expected to be a part of the standard in the future.
Why is BIMI important for email marketing?
Here is some importance of BIMI for email marketing.
1 – BIMI combats phishing and fraudulent emails
For email marketers, it is essential to protect your brand from fraudulent activities. However, sending a secure email often involves complicated processes that are time-consuming and difficult to implement.
As a result, malicious internet users take advantage of this vulnerability to perform fraudulent activities. So far, the FBI has reported a $43 billion scam between July 2019 and December 2021 due to a business email compromise (BEC).
But with BIMI, as an email marketer, you can add an extra layer of security protocol and certificates to domains to prevent them from being used by malicious users. This enables you to protect your brand’s reputation and improve the trust of your consumers.
2 – BIMI increases engagement rates
In 2018, Yahoo Mail carried out a test on a BIMI pilot project where emails without logos were compared with the ones that had logos.
The result showed that emails with logos had an increased engagement rate of 10%. Since the brand logo is displayed next to the email messages, subscribers can identify authentic email senders with ease, thereby boosting trust and credibility in your email messages.
Consequently, this process boosts the trust of consumers in your brand and influences them to open and engage with your emails. In the end, you gain more value with your email campaigns.
How to set up BIMI
When BIMI was first introduced, the setup process was a bit tedious, often involving approvals to participate in the pilot test by the AuthIndicators Group.
Over the years, the process has been simplified to make it easy to use. If you intend to use the system, here is a guide that can help you set up BIMI for your domain.
1 – Authenticate your organization’s emails with SPF, DKIM, and DMARC
BIMI doesn’t work as a standalone protocol. It works in tandem with other email authentication protocols to tell recipients that the emails are indeed coming from you.
Hence, you have to ensure that your sending domain has properly implemented SPF, DKIM, and DMARC (the three standards in the email industry).
To be more precise, you will want to ensure that SPF, DKIM, and DMARC are all properly implemented. It is the first and most crucial step in displaying your logo. You can learn how to set up your SPF and DKIM here.
Next, enforce the DMARC policy on the “From” domain. When setting DMARC up, you have to publish the DMARC policy that consists of the “none” flag. This ends up in requesting data exports.
Then, you analyze the data and modify the mail streams appropriately. Afterwards, you modify the DMARC value of “none” to “quarantine” or “reject.” The enforcement policy helps you to build a positive reputation with your audience and let them know the emails come from you.
Here’s how to set up a DMARC record.
You will have to go to your domain name system (DNS) and add a new record.
Suppose you’re using NameCheap, here is how to proceed.
Click on your domain name in the NameCheap dashboard, and then go to Advanced DNS > Add a New Record.
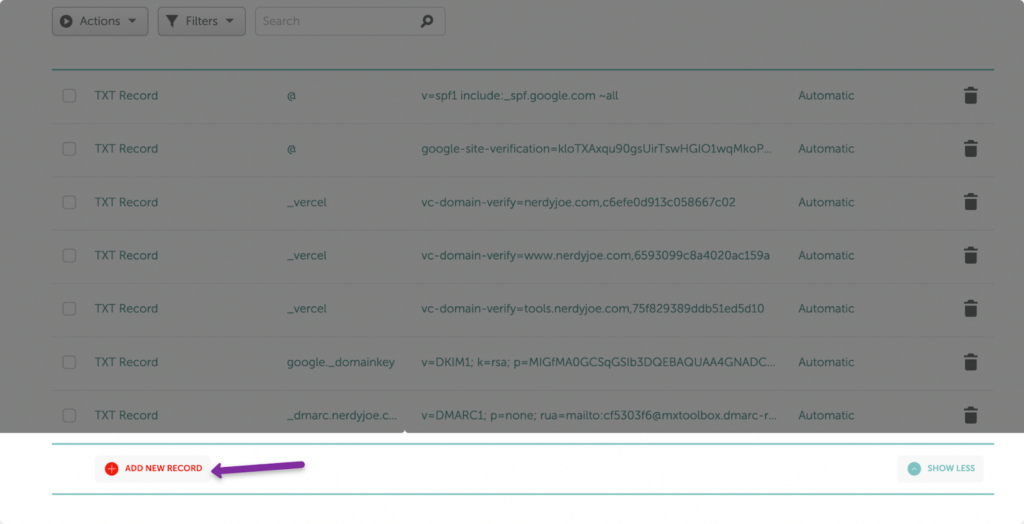
Here’s how to fill each field:
- Type: select TXT Record
- Host: Add your domain host name preceded by “_dmarc”. (i.e., _dmarc.nerdyjoe.com)
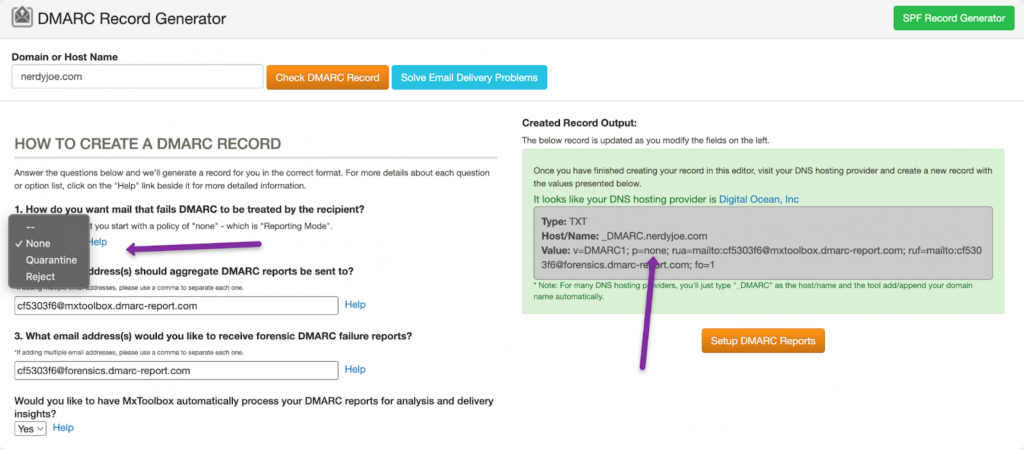
- Value: Use MxToolbox’s DMARC generator to quickly generate a DMARC record sample.
Here’s how to get a DMARC record from MxToolbox’s DMARC generator:
👉 Enter your hostname.

👉 Hit enter or select Check DMARC Record. You’ll then get a DMARC value suggestion.
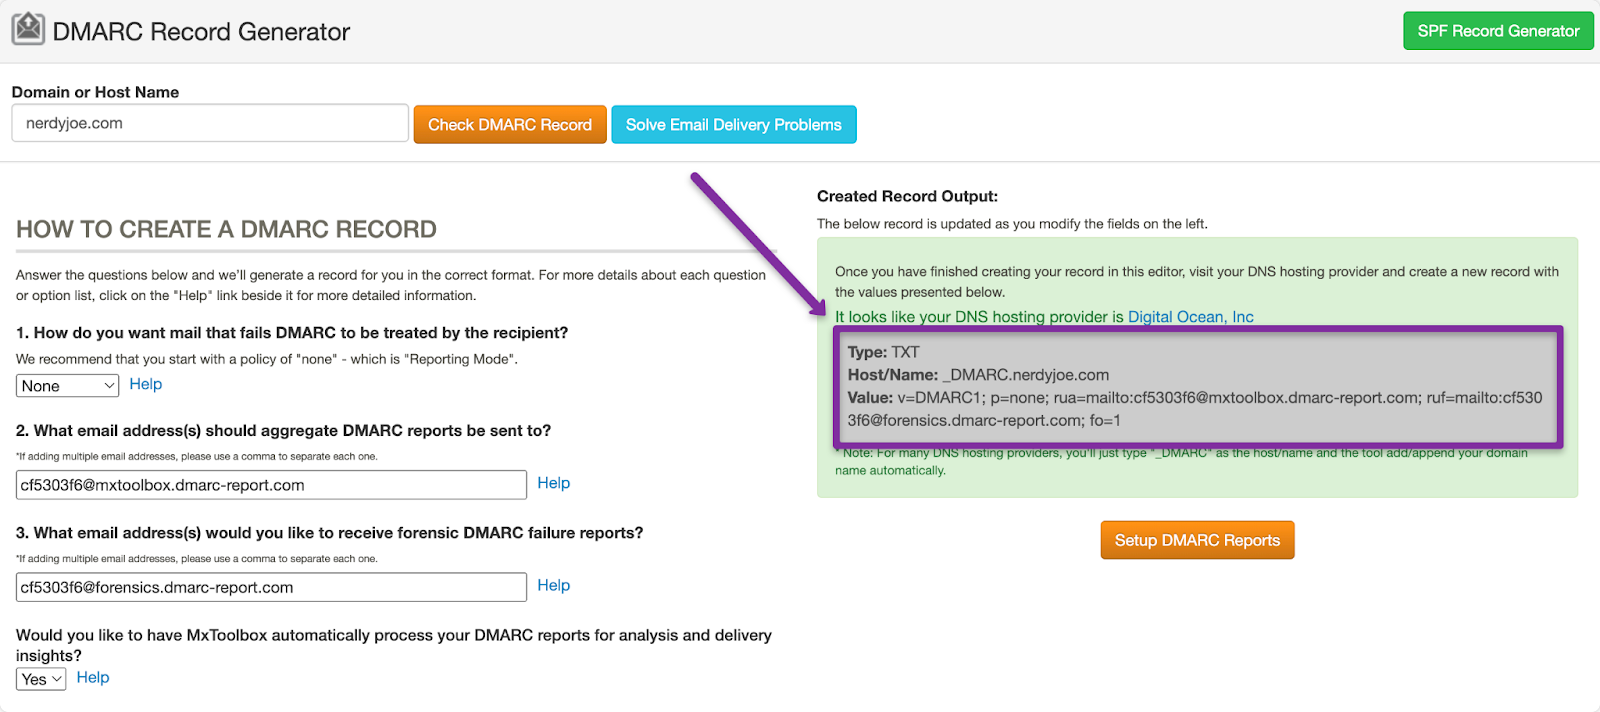
👉 Set up your DMARC policy.
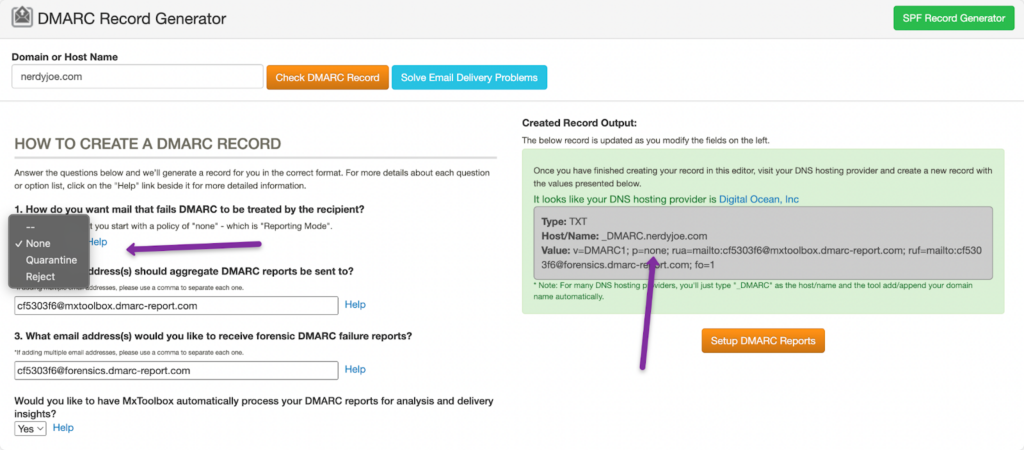
You have three options:
- None: Letting the receiving server decide.
- Quarantine: Indicating the spam folder.
- Reject: Indicating a rejection.
As you change the DMARC policy, the tool modifies the value to align with your chosen policy.
After you’re done setting up your DMARC, you must ensure that the percentage of mail to which your enforced DMARC policy is applied is 100. Doing so helps ensure that the enforced policy applies to all mail.
Here’s an example of a BIMI compliant DMARC record.
v=DMARC1; p=quarantine; rua=mailto:cf5303f6@mxtoolbox.dmarc-report.com; pct=100; aspf=s; adkim=s;
2 – Produce a Scalable Vector Graphics (SVG) Tiny Version of your official logo
The main benefit of BIMI is to have your brand’s logo stand next to the content of your email in the inbox.
BIMI requires a specific and secure image format that is in the correct size and shape if you want to include the logo — and that format should be in SVG.
To do this, you will need a copy of your logo like the one below.
- Solid background color
- Square aspect ratio
- Not more than 32 kilobytes
- Centralize your image and have enough space around it. This is necessary in case the image gets rounded or the corners are cut off.

Once you have obtained your logo, convert it to SVG using a conversion website like Convert.io or AConvert. Currently, the best results can be achieved with AConvert.
So, head over to https://www.aconvert.com/image/ follow these steps.
👉 Select the source of your image and upload it to AConvert

👉 Set the target conversion format to SVG
👉 Click to “Convert Now!”, download your file or click on the link.

Now that you have your logo in SVG format, you will need to upload it. When you have uploaded, copy the URL so you can add it to your BIMI record.
Once your SVG file is ready, you can now upload it to a publicly accessible server.
3 – Acquire a Verified Mark Certificate (VMC) for your logo
Although this step is optional, the BIMI GROUP recommends it. These are digital certificates that enable organizations to display their registered trademark logo in the avatar slot alongside outgoing emails.
VMCs allow brands to validate the ownership of the brand’s logo. If you want your logo to show up in email service providers like Gmail, you will need to get one. At the moment, only two mark verifying authorities issue VMCs – Entrust DataCard and DigiCert.
4 – Publish a BIMI TXT record for your domains in your DNS
The next step is to create a TXT record on your domain’s name servers. This step happens in various ways and often requires the expertise of your engineers and technical team.
Nonetheless, the TXT straightforwardly records itself.
You will need to gain access to your DNS and create a new txt record at the default._bimi subdomain. Then, you will need to add the following values.
default._bimi.[domain] IN TXT “v=BIMI1; l=[SVG URL]; a=[PEM URL]
The parts you need to fill include:
- Domain – your domain name.
- SVG URL – the address that hosts your logo file.
- PEM URL – an optional address for your VMC.
You can use a BIMI record generator to set it up. All you have to do is to input your domain, SVG file, and the optional VMC file where necessary.
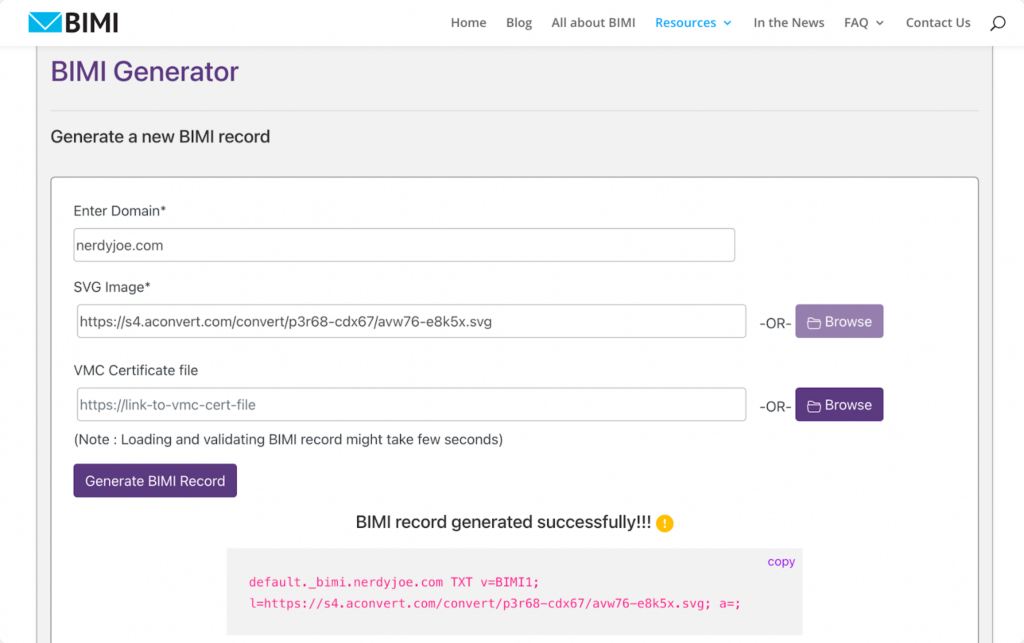
Now that you are clear on the data you need, here are the steps you need to follow to create and publish the record in your DNS.
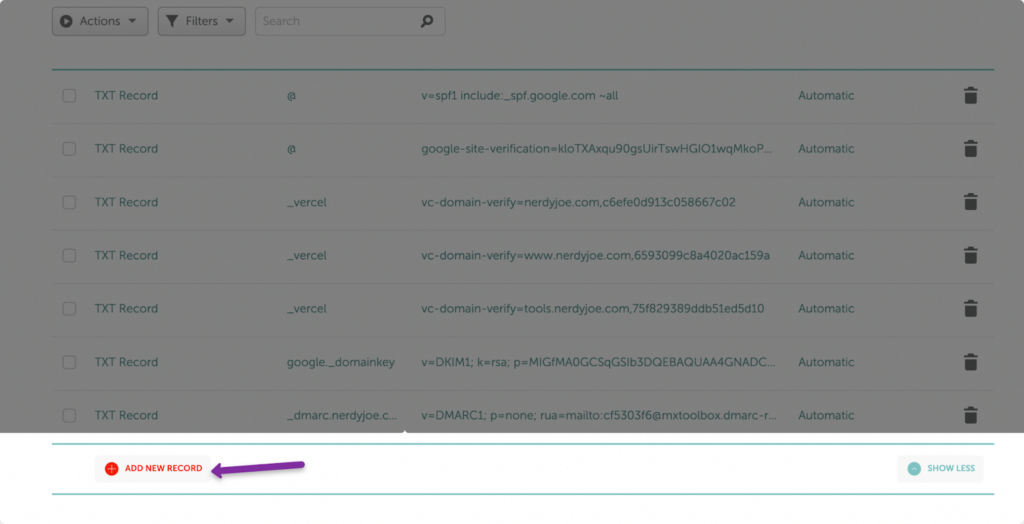
Log in on your DNS and click on “Add New Record”
Click on your domain name in the NameCheap dashboard, and then go to Advanced DNS > Add a New Record.
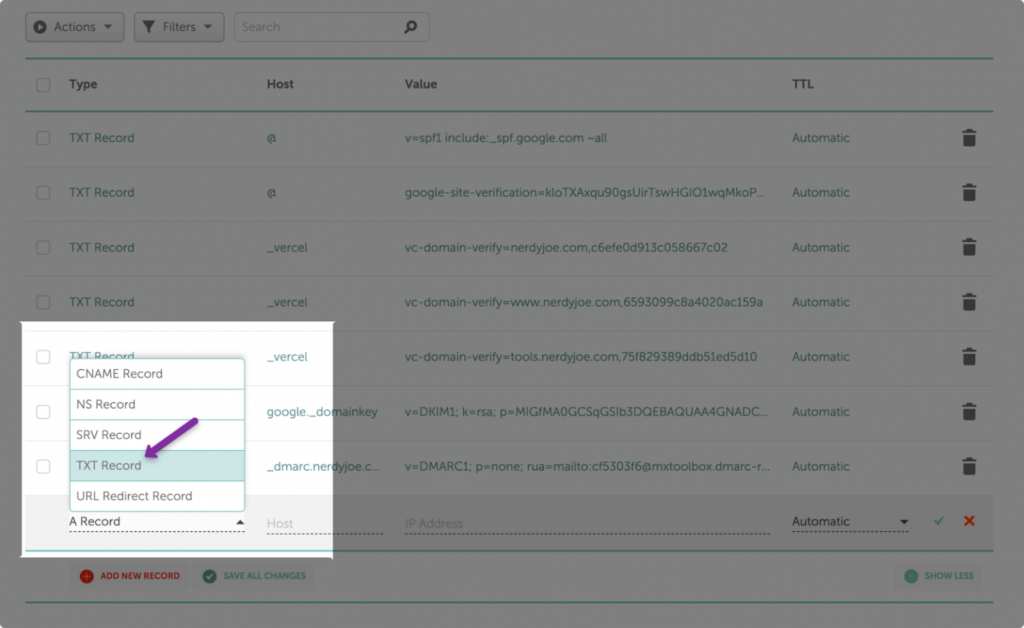
Select TXT DNS Record Type
In your DNS provider’s dropdown menu, you’ll probably find a list of different types of DNS records. You should select the “TXT Record” option because they are BIMIs’ are TXT DNS records.
Add the BIMI Host Value
After you enter the value bimi, your host will automatically add the domain following that provided value. (ex: default.bimi.nerdyjoe.com)

Add “Value” Information
Every BIMI record must contain two tag-value pairs: v and l.
- The only tag-value pair for v (version) is v=BIMI1
- Confirm l (location) tag is present and followed by a full URL of your logo using HTTPS (l is lowercase L)

Publish your record
Click on the Save all changes button to publish your BIMI record.

How to check if BIMI is set up properly
Once you have done everything, you may begin to wonder whether you have set it up accurately.
To clarify this thought, you can consider using the AuthIndicator Group’s BIMI Inspector to check for the proper configuration of the BIMI. It will notify you of any issue relating to the setup process.
Let’s show you this with one company that properly has their BIMI set up properly and another that does not. Let’s start with a company that doesn’t have BIMI set up yet.
👉 Go to BIMI Inspector, add your domain name, and validate.

👉 Get the results

This completely makes sense, since we have no BIMI set up. Now, let’s look at what it looks like for MailChimp, which has BIMI set up properly.

What mailbox providers support BIMI?
Although BIMI is still relatively new, some mailbox providers have started adopting and implementing security technology.
Here are some mailbox providers that currently support BIMI include:
- Apple mail (Available in macOS/iOS 16)
- Fast mail
- Pobox
- Google Gmail
- LaPoste
- Yahoo
- AOL
- Netscape
Mailbox providers that are considering BIMI include:
- Atmail
- BT
- Comcast
- Qualitia
- Seznam
- Web.de
- GMX
- Yahoo Japan
Mailbox providers that do not support BIMI include:
- Microsoft
Key Takeaways
- BIMI enables your brand’s logo to stand next to the content of your email messages in the inbox. It works as an email security protocol to prevent malicious users from performing fraudulent activities.
- BIMI requires the proper implementation of SPF, DKIM, and DMARC records to set it up. Setting up the latter email authentication protocols also promotes brand trust and brand reputation across email clients and email inboxes.
- You will also need an SVG file and VMC file during the setting up process. Also, ensure that your mailbox providers support BIMI email specification before getting started with it.
- Need help with your email strategy and lead generation? We are email marketers and can help you get unprecedented results out of email marketing and cold emails. Talk to us here.